Installing Vertical Wood Siding A DIY Guide

Installing vertical wood siding transforms your home’s exterior, adding curb appeal and lasting value. This guide walks you through the entire process, from choosing the right materials to mastering the finishing touches. We’ll cover various wood types, preparation techniques, installation methods, and troubleshooting tips, ensuring a professional-looking result even for first-timers. Get ready to upgrade your home’s aesthetic with this step-by-step approach!
Whether you’re a seasoned DIYer or a complete novice, this guide provides a comprehensive overview of installing vertical wood siding. We’ll delve into the specifics of material selection, surface preparation, installation techniques, and finishing touches, equipping you with the knowledge and confidence to tackle this rewarding project. Let’s get started!
Types of Vertical Wood Siding
Choosing the right vertical wood siding for your project depends on factors like budget, desired aesthetic, and the climate. Different wood types offer unique properties, impacting both the look and longevity of your siding. Let’s explore some popular options.
Vertical Wood Siding Materials, Installing vertical wood siding
Several wood types are commonly used for vertical siding, each possessing distinct advantages and disadvantages. The best choice will depend on your specific needs and preferences.
Cedar: Known for its beautiful reddish-brown hue, natural resistance to rot and insects, and pleasant aroma, cedar is a premium choice. It’s relatively lightweight and easy to work with, making installation straightforward. However, cedar can be more expensive than other options and requires regular maintenance to preserve its color and prevent weathering. It’s also susceptible to warping if not properly dried and installed.
Redwood: Similar to cedar in its natural resistance to decay and insects, redwood boasts a rich, reddish-brown color that deepens with age. It’s exceptionally durable and can withstand harsh weather conditions, making it a good choice for coastal areas. However, like cedar, redwood is a premium material with a higher price tag and requires periodic maintenance to retain its appearance.
Pine: A more affordable option compared to cedar and redwood, pine is readily available and easy to work with. It’s a versatile wood that can be stained or painted to achieve various looks. However, pine is less naturally resistant to rot and insects than cedar or redwood, requiring treatment with preservatives to extend its lifespan. It’s also more prone to dents and scratches.
Composite Wood Siding: Composite siding mimics the look of wood but is made from a blend of wood fibers and recycled materials, often with added polymers for durability and weather resistance. It’s low-maintenance, requiring minimal upkeep, and comes in various colors and textures. However, composite siding can be more expensive than natural wood initially and may not have the same aesthetic appeal to some homeowners. It can also be more difficult to repair than natural wood siding.
Comparison of Vertical Wood Siding Options
This table summarizes the cost, durability, and maintenance requirements of the discussed wood siding options. Keep in mind that prices can vary depending on location and supplier.
| Siding Type | Cost (Relative) | Durability | Maintenance |
|---|---|---|---|
| Cedar | High | High | Moderate |
| Redwood | High | Very High | Moderate |
| Pine | Low | Moderate | High |
| Composite | Medium to High | High | Low |
Aesthetic Differences in Vertical Wood Siding Profiles
The profile of your siding significantly impacts its overall appearance. Different profiles create unique visual effects and can complement various architectural styles.
Shiplap: Shiplap siding features overlapping boards with a visible, slightly recessed groove. This creates a clean, modern look that is very popular in contemporary and farmhouse-style homes. Imagine a series of horizontal lines, each slightly inset from the one above it, creating a shadow line that accentuates the horizontal texture. The image would showcase a clean, even surface with the subtle shadow lines giving it depth.
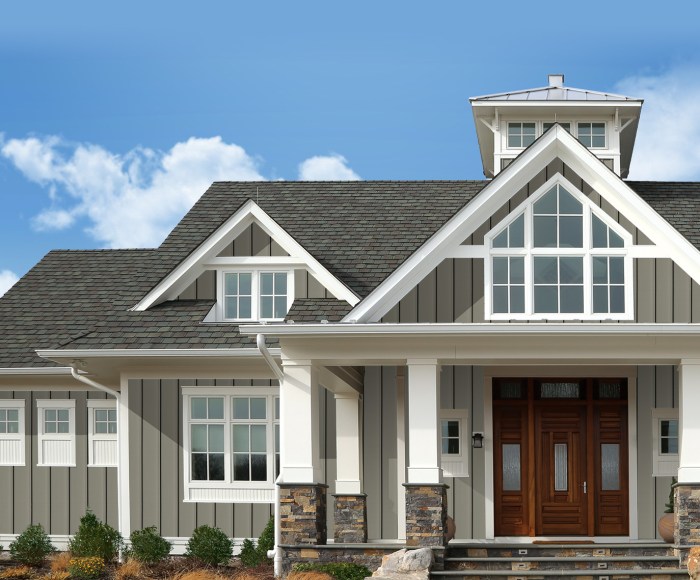
Board and Batten: Board and batten uses wider vertical boards spaced apart and covered with narrower strips (battens) that cover the gaps between the boards. This creates a rustic, traditional look often seen in farmhouses and cottages. The image would show wide, vertical planks with narrower strips covering the seams, giving a more textured and less uniform look than shiplap. The contrast between the wide boards and the thin battens would be visually striking.
Clapboard (Bevel Siding): While typically installed horizontally, clapboard can also be installed vertically. It features tapered boards that overlap, creating a layered effect. This style provides a classic, traditional look suitable for various architectural styles. The image would display a series of overlapping boards, each progressively narrower at the top, creating a slightly staggered, layered effect. The subtle shadow lines created by the overlapping boards would add depth and visual interest.
Preparing the Surface for Installation
Source: kebony.com
Getting your wall ready is crucial for a long-lasting, beautiful vertical wood siding job. A well-prepared surface ensures the siding adheres properly and prevents future problems like rot or warping. This involves cleaning, repairing any damage, and applying protective treatments. Let’s break down the process step-by-step.
Proper surface preparation involves several key steps to ensure a successful siding installation. Neglecting this stage can lead to problems down the line, impacting both the aesthetics and longevity of your project. Careful attention to detail now will save you headaches later.
Cleaning the Wall Surface
Thoroughly cleaning the wall removes dirt, debris, loose paint, and any other contaminants that could interfere with the adhesion of the siding or the waterproofing treatments. Use a pressure washer for efficient cleaning, ensuring you maintain a safe distance to avoid damaging the wall’s surface. For stubborn stains, consider using a suitable cleaning solution, following the manufacturer’s instructions carefully. After cleaning, allow the wall to dry completely before proceeding to the next steps.
Repairing Damaged Areas
Before installing siding, address any damaged areas on the wall. This might include filling cracks or holes with appropriate patching compound, repairing damaged sheathing, or replacing rotten wood. Ensure the patching compound is compatible with the wall material and properly cured before continuing. For significant damage, consider consulting a professional to ensure the structural integrity of the wall.
Applying Waterproofing Treatment
Applying a waterproofing treatment protects the wall from moisture damage, extending the life of both the wall and the siding. This is especially important in areas with high humidity or rainfall. Select a waterproofing product suitable for your wall material and climate. Apply the treatment according to the manufacturer’s instructions, ensuring complete coverage. Allow sufficient drying time before proceeding with siding installation.
Surface Levelness and Plumbness
A level and plumb surface is essential for a professional-looking and properly functioning siding installation. Use a level and plumb bob to check the wall’s surface, identifying any deviations. Minor irregularities can often be addressed with shims placed behind the furring strips or by adjusting the framing. For significant deviations, more extensive work might be necessary to ensure a flat surface before installation begins. This includes potentially replacing sections of damaged sheathing or framing.
Surface Preparation Checklist
This checklist will help you gather everything you need and ensure you don’t miss any crucial steps.
- Pressure washer
- Cleaning solution (if needed)
- Patching compound
- Putty knife
- Caulk
- Waterproofing treatment
- Paintbrushes/rollers
- Level
- Plumb bob
- Shims
- Safety glasses
- Work gloves
Installation Methods and Techniques
Installing vertical wood siding is a straightforward process, but attention to detail ensures a professional-looking and long-lasting finish. Proper preparation and consistent technique are key to achieving a successful installation. This section Artikels the step-by-step process, along with variations in techniques.
Step-by-Step Vertical Wood Siding Installation
The following steps detail a common method for installing vertical wood siding. Remember to always consult the manufacturer’s instructions for your specific siding product.
- Establish a Level Starting Point: Begin by installing a level starter strip along the bottom of the wall. This strip provides a straight, even base for the first course of siding. Use a level and a chalk line to ensure perfect alignment. Secure the starter strip with appropriate fasteners, spacing them according to the manufacturer’s recommendations. Common fasteners include galvanized nails or screws.
- Install the First Course of Siding: Position the first siding board against the starter strip, ensuring it’s flush and level. Pre-drill pilot holes to prevent splitting, especially with harder wood species. Use galvanized nails or screws to secure the board, driving fasteners slightly below the surface to allow for caulking. A nail gun can significantly speed up this process. Maintain consistent spacing between fasteners.
- Continue Installing Subsequent Courses: Overlap each subsequent board with the previous one, ensuring a consistent overlap throughout the project. This overlap is crucial for water management. Use a level to check alignment frequently and adjust as needed. Remember to pre-drill pilot holes before fastening each board.
- Nail Pattern Considerations: A staggered nail pattern helps to prevent warping and provides better overall strength. Avoid placing nails too close to the edges of the boards. Aim for the center of each board section for maximum holding power. You might also consider using a combination of nails and screws for added security, particularly in high-wind areas.
- Cutting and Fitting Around Obstacles: When encountering windows, doors, or corners, carefully measure and cut the siding boards to fit. Use a miter saw for precise cuts. Remember to account for expansion and contraction of the wood. Use caulk to seal gaps between the siding and the trim around these features.
- Installing the Final Course: The final course of siding will likely require trimming to fit the top of the wall. Ensure a straight, level cut and secure the board using the same techniques as the previous courses. Remember to account for any flashing or trim needed at the top of the wall.
- Caulking and Finishing: Once all siding is installed, apply a high-quality exterior-grade caulk to seal all gaps and joints, preventing water penetration. This step is critical for preventing water damage and ensuring longevity of the siding. Caulk should be applied neatly and smoothed for a professional finish.
Comparison of Installation Techniques
While the method described above is common, variations exist. Using a starter strip is highly recommended for ensuring straightness and a consistent gap. The amount of overlap can vary depending on the siding’s thickness and the manufacturer’s specifications. Some installers prefer using a combination of nails and screws for enhanced security. Others might utilize hidden fasteners for a cleaner aesthetic, although this typically adds to installation complexity and cost. Different nail patterns (staggered versus straight) offer varying degrees of holding power and resistance to warping. The choice of technique depends on factors like the type of wood, climate, and personal preference.
Cutting and Measuring Wood Siding

Source: visexterior.com
Precise cutting and measuring are crucial for a professional-looking vertical wood siding installation. Inaccurate cuts will lead to gaps, misaligned pieces, and an overall unprofessional finish. This section details the techniques and tools necessary for achieving accurate cuts, ensuring a seamless and aesthetically pleasing result.
Miter Cuts for Corners and Angles
Miter cuts are angled cuts made at the ends of the siding boards to create a clean, 45-degree angle at inside and outside corners. This is essential for achieving a tight, aesthetically pleasing join. For inside corners, two pieces of siding are mitered at 45 degrees, with the cuts facing each other. For outside corners, the miter cuts are also at 45 degrees, but the cuts face away from each other. Accurate measurement is key; even a slight inaccuracy will result in a noticeable gap. A miter saw is the ideal tool for making these cuts, as it allows for precise angle adjustments. Always double-check your measurements before cutting. If using a hand saw, a miter box will aid in creating accurate 45-degree angles. Remember to account for the thickness of the siding when measuring for inside corners; the two pieces need to fit together snugly.
Coping Cuts for Irregular Shapes
Coping cuts are used to fit siding around complex shapes, such as curved window frames or irregularly shaped openings. This technique involves cutting one piece of siding to precisely match the contour of the adjacent surface. This usually requires a combination of measuring, marking, and careful cutting with a hand saw or jigsaw. A coping saw, with its fine blade, is often preferred for intricate shapes. Before cutting, carefully trace the shape of the surface onto the siding board. Then, carefully cut along the marked line, ensuring a tight fit. Test-fitting frequently is crucial to avoid mistakes.
Measuring and Cutting for Windows and Doors
Accurately measuring and cutting siding around windows and doors requires careful planning. Begin by measuring the exact dimensions of the window or door opening. Then, measure the width of your siding boards and calculate how many boards are needed to cover the area. For precise fitting, consider using a combination of full-length boards and shorter pieces cut to fit the remaining space. It’s often best to start by installing the vertical pieces that flank the window or door, ensuring these are perfectly plumb. Then, measure and cut the horizontal pieces to fit snugly between these vertical pieces. Remember to account for expansion and contraction of the wood due to changes in humidity and temperature.
Visual Guide: Measuring and Cutting Siding at Different Angles
Imagine a diagram showing a corner. For an inside corner, two 45-degree miter cuts are shown on two siding boards, facing each other. The diagram clearly shows how these two boards will fit together snugly, forming a perfect 90-degree inside corner. Next, visualize a similar diagram but showing an outside corner. Again, 45-degree miter cuts are shown, but this time the cuts face away from each other. The diagram illustrates how the two boards form a perfect 90-degree outside corner. Finally, a diagram shows a window opening. Full-length vertical boards are shown flanking the window. Shorter pieces are shown neatly fitted above and below the window, demonstrating how to cover the remaining area. The diagram also includes measurements and labels to clarify the cutting and fitting process. Accurate measurements and precise cuts are crucial for a professional result in all scenarios. A final diagram shows a curved window frame. A siding board is shown with a curved cut, illustrating the process of a coping cut. This shows how the siding is cut to precisely match the curve of the window frame.
Finishing Touches and Maintenance
Source: amazonaws.com
Installing vertical wood siding is a rewarding project, but the final touches and ongoing maintenance are crucial for ensuring its longevity and beauty. Proper caulking and sealing prevent water damage, while regular cleaning and protective treatments safeguard the wood from the elements and maintain its aesthetic appeal. This section details these essential steps.
Caulking and Sealing
Caulk and sealant are your best friends when it comes to preventing water intrusion. These materials create a waterproof barrier around windows, doors, and any other areas where the siding meets other building materials. A thorough job here will save you headaches down the line. Apply a high-quality, paintable exterior-grade caulk in a smooth, consistent bead, ensuring complete coverage of any gaps or cracks. For larger gaps, consider using backer rod to create a more stable and efficient seal before applying the caulk. Remember to choose a caulk that is compatible with both the siding material and the surrounding surfaces. Allow the caulk to fully cure according to the manufacturer’s instructions before painting. This typically takes 24-72 hours depending on the product and weather conditions.
Cleaning and Maintaining Vertical Wood Siding
Regular cleaning is essential to remove dirt, debris, and mildew that can accumulate on your siding over time. For routine cleaning, a simple solution of mild detergent and water applied with a soft-bristled brush or pressure washer (using a low-pressure setting to avoid damaging the wood) is usually sufficient. Always rinse thoroughly with clean water afterward. For more stubborn stains or mildew, you might need to use a commercial wood cleaner specifically designed for exterior use, following the product instructions carefully. Inspect your siding regularly for any signs of damage, such as cracks, loose boards, or insect infestation. Address these issues promptly to prevent further problems. A yearly inspection is recommended, ideally in the spring after winter weather has passed.
Protecting Wood Siding from the Elements
Protecting your investment is key to maximizing the lifespan of your vertical wood siding. Applying a high-quality exterior wood stain, paint, or sealant provides a protective barrier against moisture, UV rays, and insect damage. Stains allow the wood grain to show through, while paint offers a more solid color and better protection from the elements. Sealants are primarily used to prevent moisture absorption, increasing the wood’s resistance to rot and decay. Before applying any of these treatments, ensure the wood is clean, dry, and free from any mildew or loose debris. Follow the manufacturer’s instructions carefully for application and drying times. Reapplication is typically necessary every few years, depending on the product used and the climate conditions. For example, in harsh coastal environments, more frequent reapplication might be needed.
Troubleshooting Common Issues
Source: architecture-collection.com
So, you’ve tackled the prep work, nailed the installation, and are almost admiring your beautiful new vertical wood siding. But what if things aren’t quite perfect? Don’t worry, even experienced pros run into snags. This section will help you identify, address, and even prevent common problems during vertical wood siding installation. Knowing what to look for and how to fix it will save you time, materials, and frustration.
Addressing common problems efficiently is crucial for a professional-looking finish. A little preventative care and understanding of potential issues can mean the difference between a job well done and a frustrating rework. Let’s get into the nitty-gritty of troubleshooting.
Uneven Gaps and Misaligned Boards
Uneven gaps between siding boards and misalignment create an unprofessional look. These issues often stem from inconsistent measurements, improper nailing, or failing to account for wood expansion and contraction. Addressing these issues involves careful inspection and correction, potentially requiring removal and reinstallation of affected sections. Prevention focuses on meticulous planning, precise measuring, and consistent installation techniques.
Damaged Siding
Damage to the siding during installation, such as dents, scratches, or cracks, can be frustrating. This often results from careless handling, improper tool use, or accidental impacts. Repairing minor damage might involve careful sanding and refinishing, while more severe damage might necessitate replacing the affected board. Prevention emphasizes careful handling of materials and the use of appropriate tools and techniques.
Siding Warping or Cupping
Wood siding is susceptible to warping or cupping due to moisture changes. This can cause gaps and uneven surfaces. Proper acclimation of the wood before installation is crucial. Selecting high-quality, properly treated lumber also reduces the risk. Addressing existing warping might involve carefully straightening the board or replacing it if the damage is severe.
Troubleshooting Guide
| Problem | Cause | Solution | Prevention |
|---|---|---|---|
| Uneven Gaps | Inconsistent measurements, improper nailing, wood movement | Re-measure and re-install affected sections, use shims as needed. | Careful measurement, consistent spacing, proper nailing techniques, use of expansion gaps. |
| Misaligned Boards | Poor planning, inaccurate measuring, improper nailing | Remove and reinstall misaligned boards. Use a level and straight edge for guidance. | Careful planning and layout, use of a chalk line, consistent nailing. |
| Damaged Siding | Rough handling, improper tool use, accidental impact | Repair minor damage with sanding and refinishing, replace severely damaged boards. | Careful handling, proper tool use, protective measures during installation. |
| Siding Warping/Cupping | Moisture changes, improper acclimation, low-quality lumber | Replace warped/cupped boards. | Properly acclimate lumber before installation, use high-quality, treated lumber. |
Closing Notes
Mastering the art of installing vertical wood siding is a rewarding experience, enhancing your home’s beauty and increasing its value. By carefully following the steps Artikeld in this guide, paying close attention to detail, and addressing potential issues proactively, you can achieve stunning results. Remember, patience and precision are key to a successful project. Now go forth and create a beautiful, lasting exterior!
Query Resolution: Installing Vertical Wood Siding
What type of nails should I use for vertical wood siding?
Use galvanized exterior-grade nails appropriate for your siding thickness. The length should be long enough to penetrate the sheathing adequately.
How often should I clean my wood siding?
A yearly cleaning with a pressure washer (low pressure setting) and mild detergent is recommended to remove dirt and debris.
Can I install vertical wood siding over existing siding?
It depends on the condition of the existing siding. If it’s sound and properly fastened, it might be possible, but check for rot or damage first. Consult a professional if unsure.
How do I prevent warping or cupping of the wood siding?
Acclimate the wood to the outdoor environment before installation. Ensure proper spacing and ventilation behind the siding to allow for air circulation.
What’s the best way to cut around windows and doors?
Precise measuring and miter cuts are essential. Use a miter saw for clean cuts and ensure a tight fit for a professional finish.
Comments are closed.