Replacing a Piece of Hardie Plank Siding

Replacing a piece of Hardie Plank siding might seem daunting, but with the right tools and a little know-how, it’s a manageable DIY project. This guide walks you through each step, from assessing the damage to achieving a professional-looking finish. We’ll cover everything from choosing the correct replacement plank to ensuring a weathertight seal, helping you tackle this repair with confidence.
This project involves careful measurement, precise cutting, and secure fastening. We’ll provide detailed instructions and tips to help you avoid common mistakes and achieve a seamless repair. Remember safety first! Always wear appropriate safety gear, including eye protection and gloves.
Identifying the Damaged Section
Replacing Hardie Plank siding starts with accurately identifying the problem area. A thorough visual inspection is crucial to determine the extent of the damage and plan the repair. This ensures you buy the right amount of replacement material and avoid unnecessary work.
Careful observation is key to assessing the condition of your Hardie Plank siding. Start by walking around your house, paying close attention to each plank. Look for any obvious signs of damage, such as cracks, holes, dents, water stains, or discoloration. These are all indicators that a section might need replacing. Remember to check both the front and the back of the siding, as damage might not always be visible from the street.
Determining the Extent of Damage
Once you’ve located the damaged area, the next step is to determine how much siding needs to be replaced. A small crack might only require patching, while extensive damage will necessitate replacing a whole plank or even several. For example, if a crack runs the entire length of a plank, replacement is almost certainly necessary. Similarly, if significant water damage has softened the wood backing of the siding, the entire affected section must be replaced to prevent further problems. Consider the structural integrity; if a section is loose or compromised, it’s best to replace it rather than risk further damage. A safe margin around the visibly damaged area should be considered, to ensure no hidden damage is left behind.
Measuring the Damaged Area
Accurate measurements are essential for buying the correct amount of replacement Hardie Plank. Use a measuring tape to determine the length and width of the damaged area. For larger areas, it’s helpful to break down the measurements into smaller, manageable sections. Always measure twice to avoid errors. For instance, if you’re replacing a section that measures 4 feet long and 6 inches wide, make sure you note this down precisely to avoid buying insufficient material.
Assessing Surrounding Planks
Before beginning the replacement, it’s important to check the condition of the surrounding planks. Look for any signs of damage that might indicate further problems. This preventative step will save you time and money in the long run, avoiding future repairs. A checklist can help ensure thoroughness:
- Inspect adjacent planks for cracks or damage.
- Check for loose nails or fasteners.
- Examine for any signs of water damage or rot.
- Assess the overall condition of the caulking around the damaged area.
Addressing any issues found during this assessment before starting the main repair will streamline the whole process and prevent further problems down the line. For example, if you find loose nails, tighten them before proceeding with the main repair to ensure a secure and lasting result.
Gathering Necessary Tools and Materials
Source: amazonaws.com
Replacing a section of Hardie Plank siding requires the right tools and materials to ensure a smooth and professional-looking repair. Having everything prepared beforehand saves time and prevents frustrating interruptions during the project. This section Artikels the essentials for a successful repair.
Essential Tools for Hardie Plank Siding Repair
Before starting, gather all necessary tools. This will streamline the process and ensure you have everything you need at your fingertips. Improper tools can lead to damage to the siding or injury to yourself.
- Measuring tape: Accurate measurements are crucial for cutting the replacement piece to the correct size.
- Pencil: Mark cutting lines clearly on the new siding piece.
- Circular saw with a fine-tooth blade: Provides clean cuts on the Hardie Plank. A blade specifically designed for fiber cement is recommended for best results.
- Safety glasses: Protect your eyes from flying debris during cutting.
- Work gloves: Protect your hands from splinters and rough edges.
- Pry bar: Carefully remove the damaged siding section.
- Hammer: Drive in nails or screws securely.
- Caulk gun: Apply caulk to seal gaps and ensure watertightness.
- Putty knife: Clean up excess caulk and smooth out any imperfections.
- Ladder (if necessary): Safe access to higher areas.
Hardie Plank Color Codes
Choosing the right color match is essential for a seamless repair. Hardie Plank offers a wide variety of colors, each identified by a specific code. Refer to the table below to find the code for your existing siding. Note that color perception can vary slightly depending on your screen; always verify the color in person at a building supply store before purchasing.
| Color Name | Color Code | Color Name | Color Code |
|---|---|---|---|
| Arctic White | 700 | Cobblestone Gray | 760 |
| Natural Shadow | 710 | Countrylane Red | 770 |
| Sand Dune | 720 | Iron Gray | 780 |
| Aged Pewter | 730 | Medium Gray | 790 |
| Board & Batten | 740 | Dutch Blue | 800 |
| Cypress Green | 750 | … | … |
Safety Equipment for Hardie Plank Installation
Working with Hardie Plank and power tools requires appropriate safety precautions. Neglecting safety can lead to serious injuries.
- Safety Glasses: Always wear safety glasses to protect your eyes from flying debris and dust generated during cutting and installation.
- Work Gloves: Protect your hands from splinters and sharp edges of the Hardie Plank material.
- Hearing Protection: Power tools can generate significant noise; earplugs or earmuffs are recommended, especially for extended periods of work.
- Dust Mask: Hardie Plank generates dust during cutting; a dust mask prevents inhalation of harmful particles.
- Ladder Safety: If using a ladder, ensure it is properly positioned and secured before climbing. Always follow manufacturer’s instructions.
Suitable Fasteners for Hardie Plank, Replacing a piece of hardie plank siding
The right fasteners are crucial for a secure and long-lasting repair. Using inappropriate fasteners can compromise the structural integrity of the siding.
- Galvanized Nails: These provide excellent corrosion resistance, essential for outdoor applications. Nail size should be appropriate for the thickness of the Hardie Plank and the underlying sheathing.
- Stainless Steel Screws: An alternative to nails, screws offer superior holding power, especially in areas subject to high winds. They should be specifically designed for exterior use.
- Avoid using common nails or screws not designed for exterior applications, as these are prone to rust and corrosion, compromising the integrity of the siding and potentially leading to premature failure.
Removing the Damaged Siding

Source: gambrick.com
Carefully removing the damaged Hardie Plank siding is crucial to avoid further damage to your home’s exterior. This process requires patience and the right tools to ensure a clean and efficient removal. Remember to always prioritize safety and wear appropriate protective gear.
Removing the damaged Hardie Plank involves a systematic approach to minimize the risk of harming surrounding planks. We’ll cover techniques for safely extracting nails and screws, preventing damage to adjacent sections, and proper disposal of the removed materials.
Nail and Screw Removal
Before attempting to remove the damaged siding, locate all nails or screws securing it to the framing. Using a pry bar or similar tool, gently begin to separate the damaged plank from the adjacent ones. Work slowly and methodically, applying pressure evenly to avoid cracking or chipping the surrounding siding. For stubborn nails or screws, consider using a nail puller or a reciprocating saw with a fine-tooth blade to cut through the fasteners close to the siding. Once the fasteners are cut or removed, carefully pry the damaged plank away from the wall.
Preventing Damage to Adjacent Planks
Protecting the surrounding Hardie Plank is essential. Using a pry bar, insert it between the damaged and adjacent planks, ensuring the pry bar’s flat surface is against the undamaged plank. A thin piece of wood or scrap metal can be placed between the pry bar and the good siding to distribute the pressure and further prevent damage. Apply even pressure and leverage to avoid bending or breaking adjacent planks. Work slowly and methodically. If the damaged section is particularly stubborn, consider using a small hammer to gently tap the pry bar to loosen the plank.
Disposal of Removed Siding and Materials
Once the damaged siding is removed, properly dispose of all materials. Nails, screws, and broken pieces of siding should be collected and placed in a sturdy container to prevent accidental injury. Larger pieces of siding can be broken down into smaller, manageable pieces if necessary. Check with your local waste management facility for guidelines on disposing of Hardie Plank siding and other construction debris. Some areas have specific requirements for the disposal of asbestos-containing materials, so it’s essential to verify if your siding contains asbestos before disposal. If it does, follow all local regulations and contact a licensed professional for removal.
Preparing for Installation
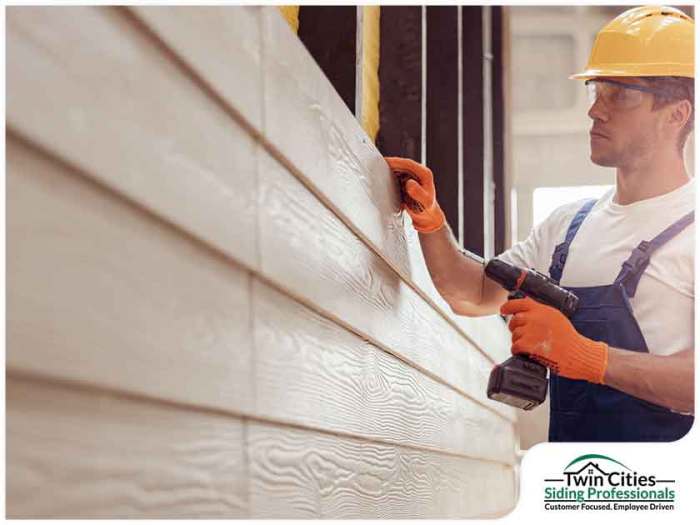
Source: tcsidingprofessionals.com
Now that the damaged section is removed, it’s time to get the new Hardie Plank ready for installation. This involves prepping the area, ensuring a precise fit, and addressing any underlying problems. Careful preparation will lead to a seamless and long-lasting repair.
Proper preparation is crucial for a successful Hardie Plank replacement. This includes cleaning the area, checking for moisture, and making sure the surrounding siding is stable and secure. A well-prepared surface ensures the new piece integrates flawlessly with the existing siding.
Surface Preparation
Before installing the new Hardie Plank, thoroughly clean the area around the opening. Remove any debris, dust, loose paint, or old caulk. A clean surface ensures proper adhesion of the new siding and prevents future problems. If there’s any evidence of water damage behind the siding, such as rotted wood, this must be addressed before proceeding. This might involve replacing damaged wood framing or sheathing. Allow the area to fully dry before installing the new siding.
Ensuring Proper Fit
Accurate measurements are paramount. Measure the width and height of the opening where the new Hardie Plank will be installed. Add a small amount of extra length (about 1/8 inch) to account for expansion and contraction. Carefully check the alignment with the surrounding planks to ensure a flush and even fit. Any gaps or misalignments can compromise the integrity of the siding and lead to water penetration. A perfectly fitting replacement ensures a clean, professional-looking repair.
Addressing Underlying Issues
If you discover water damage behind the removed siding, such as rotted wood or moisture-damaged sheathing, it’s crucial to address these issues before installing the new Hardie Plank. Repair or replace any damaged wood, ensuring it’s completely dry before proceeding. Failure to address underlying water damage will lead to recurrence of the problem and may compromise the integrity of the entire wall. In such cases, you might need to apply a wood preservative to protect the repaired areas from future rot.
Cutting the New Hardie Plank
Use a sharp circular saw with a fine-tooth blade designed for cutting fiber cement. This will provide a clean, precise cut and minimize chipping or splintering. Score the plank lightly before making the full cut to prevent cracking. Measure twice and cut once to ensure accuracy. Always wear appropriate safety gear, including eye protection and a dust mask, when cutting Hardie Plank. For complex cuts, consider using a jigsaw for greater maneuverability. Remember, accuracy in cutting is key to a successful installation.
Installing the Replacement Plank
Now that you’ve prepped the area and have your new Hardie Plank ready, it’s time for installation. This process requires precision and care to ensure a seamless and lasting repair. Remember to always wear appropriate safety gear, including gloves and eye protection.
Fitting the new Hardie Plank into place is a bit like putting together a jigsaw puzzle. You need to carefully align it with the existing siding to create a clean, even look. Start by gently sliding the new plank into the space, making sure it’s flush against the adjacent pieces. Take your time; rushing this step can lead to misalignment and gaps.
Aligning the New Plank
Proper alignment is crucial for a professional-looking repair. Begin by checking the vertical and horizontal alignment of the new plank with the surrounding siding. Use a level to ensure the plank is perfectly straight. Small adjustments can often be made by gently pressing or pulling on the plank until it’s correctly aligned. If you notice any significant gaps, you may need to adjust the surrounding planks slightly before proceeding. Precise alignment will minimize the visibility of the repair.
Fastening the New Plank
Once the new plank is perfectly aligned, it’s time to secure it. Use galvanized nails or screws specifically designed for Hardie Plank siding. These fasteners are resistant to corrosion and ensure a strong, long-lasting hold. Space the fasteners according to the manufacturer’s recommendations, typically every 6-8 inches. Drive the fasteners straight into the plank, avoiding any bending or twisting. Be careful not to over-drive the fasteners, as this can damage the plank and create unsightly dimples. A slightly countersunk fastener will provide a clean, finished look.
Achieving a Seamless Finish
After securing the new plank, inspect the edges for any gaps or misalignments. Caulk any gaps between the new plank and the surrounding siding using a high-quality exterior-grade caulk that matches the color of your siding. This will create a waterproof seal and prevent water damage. Once the caulk is dry, carefully wipe away any excess with a damp cloth. Finally, inspect your work from a distance to ensure the repair is completely invisible. A well-executed repair should blend seamlessly with the rest of your siding. Consider using a touch-up paint to match the existing siding, if needed, for a truly flawless finish.
Finishing Touches and Inspection
After installing your new Hardie plank siding piece, the final steps involve careful inspection and finishing touches to ensure a weathertight and aesthetically pleasing repair. This process is crucial for the longevity and protection of your home’s exterior. Taking your time here will prevent future problems.
Thorough inspection ensures the new siding integrates seamlessly with the existing structure and that the repair is effective. Proper caulking and sealing prevent water intrusion, a major cause of damage to siding and underlying structure. Finally, cleaning up the work area leaves your space tidy and ready for other tasks.
Siding Inspection
Inspecting the newly installed siding involves a visual check for several key elements. First, ensure the new plank is flush with the surrounding siding, without any gaps or misalignments. Look for any protruding nails or screws, which should be set slightly below the surface and covered with appropriate filler. Check for damage to the new plank during installation – even minor scratches or chips can compromise its weather resistance. Finally, compare the color and texture of the new piece to the surrounding siding to ensure a consistent appearance. Any discrepancies might require further adjustments or replacement.
Caulk and Sealant Application
Applying caulk or sealant is critical for weatherproofing the repaired area. Before applying, ensure the surface is clean and dry. Use a high-quality exterior-grade caulk, preferably one that matches the color of your siding. Apply a thin, even bead of caulk along all edges of the new siding where it meets the existing siding and trim. Use a caulking tool to smooth the bead and create a neat, weathertight seal. Allow the caulk to cure completely according to the manufacturer’s instructions before exposing the area to rain or extreme weather. For example, a common high-quality exterior caulk is paintable acrylic latex caulk, known for its flexibility and durability in various weather conditions.
Cleanup Procedures
Cleaning up after the siding repair involves gathering and disposing of all debris, including scrap pieces of siding, nails, screws, and packaging materials. Sweep or vacuum the work area to remove any sawdust or other small particles. Dispose of all materials responsibly, following local waste disposal regulations. If any paint or caulk was used, clean up any spills or splatters immediately to prevent them from drying and becoming difficult to remove. Consider using a drop cloth to minimize mess during the project.
Final Inspection Checklist
Before considering the repair complete, use this checklist for a final walk-through:
- New siding is flush with surrounding siding.
- All nails and screws are properly set and covered.
- Caulk is applied neatly and completely seals all gaps.
- No damage to the new or surrounding siding.
- The repaired area is clean and free of debris.
- The color and texture of the new siding matches the existing siding.
Troubleshooting Common Issues: Replacing A Piece Of Hardie Plank Siding
Replacing Hardie Plank siding can present a few challenges, even for experienced DIYers. Knowing what to expect and how to handle common problems will save you time, frustration, and potentially costly mistakes. This section covers some frequently encountered issues and provides practical solutions.
Successfully navigating these challenges hinges on careful planning, precise measurements, and attention to detail throughout the installation process. Remember, patience is key!
Nail Placement and Spacing
Incorrect nail placement is a common problem. Nails driven too close to the edges of the plank can lead to cracking, while nails driven too deep can cause dimpling or damage to the surface. Conversely, nails driven too shallowly won’t provide adequate hold, potentially resulting in loose siding. Consistent spacing is crucial for maintaining a neat and structurally sound installation. Always refer to the manufacturer’s instructions for recommended nail spacing and penetration depth. Using a nail gun set to the correct depth is highly recommended for consistency. If you notice a nail is improperly placed, carefully remove it using a pry bar or nail puller, and replace it correctly. For deeply driven nails, gently pry them up to adjust the depth before re-driving.
Cutting and Fitting the Plank
Accurate cuts are essential for a seamless finish. Improperly cut planks will leave gaps, resulting in an unsightly appearance and potential water damage. Using a sharp blade, whether a circular saw or hand saw, is crucial for clean cuts. Always measure twice and cut once, taking into account the overlaps and expansion gaps required for Hardie Plank. If a cut is inaccurate, you may need to recut the plank. In the case of minor discrepancies, careful shimming might correct the fit, but for significant errors, replacement is the best solution.
Dealing with Difficult Cuts
Cutting around corners or complex shapes can be tricky. Pre-planning and the use of appropriate tools are essential to ensure accuracy and avoid damage to the plank. A jigsaw is often preferred for intricate cuts, while a circular saw can be used for straight cuts. Always use a fine-toothed blade to prevent splintering. If you make a mistake, carefully assess the damage. Minor imperfections might be concealed with caulk, but larger errors necessitate recutting or even replacing the plank. Practice on scrap pieces of Hardie Plank before tackling the actual installation to refine your cutting technique.
Preventing Water Damage
Proper sealing and caulking are crucial to prevent water infiltration. Gaps between the planks and around windows or doors should be carefully sealed using a high-quality, paintable exterior-grade caulk. Failure to adequately seal these areas can lead to water damage, rot, and mold growth. Inspect all seams and joints after installation to ensure complete sealing. If you notice any gaps or cracks, apply additional caulk immediately.
- Problem: Cracked plank due to improper nailing.
- Solution: Replace the damaged plank, ensuring correct nail placement and spacing.
- Problem: Gaps between planks due to inaccurate cutting.
- Solution: Recut the plank or use shims to correct the fit. Seal gaps with caulk.
- Problem: Water damage due to inadequate sealing.
- Solution: Apply additional caulk to all seams and joints. Address any underlying moisture issues.
- Problem: Loose plank due to insufficient nailing.
- Solution: Remove the plank, add additional nails in the correct locations, and reinstall.
Illustrative Examples
Source: thespruce.com
Seeing the difference between correctly and incorrectly installed Hardie Plank siding is crucial for ensuring a long-lasting, weather-resistant exterior. This section provides visual descriptions to help you identify good workmanship and potential problems.
Correctly installed Hardie Plank siding presents a uniform, clean appearance. The planks should be neatly aligned, with consistent spacing between each piece and no visible gaps. Fasteners, typically nails or screws, should be countersunk and evenly spaced, leaving minimal visible surface area. The seams between planks should be straight and tight, following the lines of the house. The overall impression should be one of professional, even installation.
Correctly Installed Hardie Plank Siding
Imagine a freshly sided house. Each plank of Hardie Plank is butted tightly against its neighbor, creating a seamless, straight line across the entire wall. The nails are barely visible, countersunk just enough to be flush with the surface of the siding, and spaced consistently about every 6-8 inches along each plank. There’s a uniform gap between the planks and the trim around windows and doors, creating a clean and professional look. The vertical alignment is perfect; each plank sits directly above and below the next, creating an even, unbroken surface.
Incorrectly Installed Hardie Plank Siding
In contrast, poorly installed Hardie Plank siding exhibits several noticeable flaws. Gaps between planks are often visible, sometimes large enough to allow water penetration. Misalignment is another common problem, with planks overlapping unevenly or sitting at slightly different heights. Protruding fasteners create an unsightly and potentially damaging surface. The overall appearance is uneven and unprofessional, suggesting a rushed or unskilled installation. In some cases, you might see buckling or warping of the planks, indicating improper installation or the use of damaged materials.
Severe Weather Damage Requiring Replacement
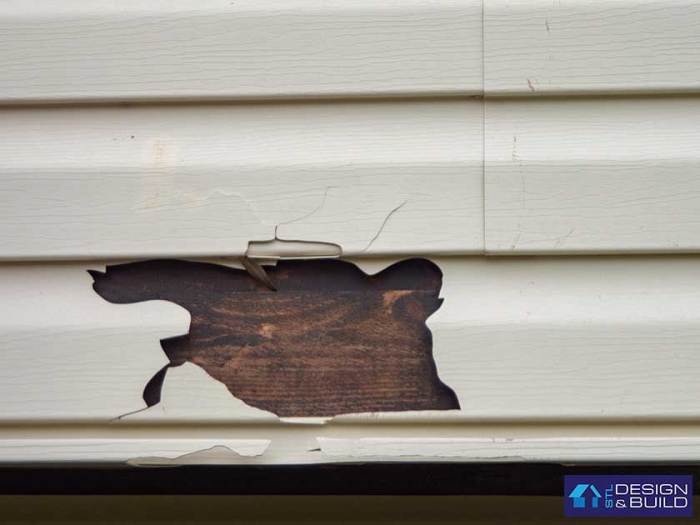
Consider a scenario where a severe hailstorm pummels a house. The impact of large hailstones causes significant damage to one section of Hardie Plank siding. A close inspection reveals a large crack running the length of a single plank, accompanied by several smaller chips and dents. The damaged plank is visibly compromised, with the integrity of the protective cement coating significantly impaired. This damage allows for water penetration, increasing the risk of rot and structural damage to the underlying sheathing. The affected plank needs replacement to maintain the building’s weather resistance and aesthetic appeal. The damaged area is clearly defined, allowing for precise removal and replacement of the affected piece.
Final Wrap-Up
Replacing a damaged piece of Hardie Plank siding is a straightforward process once you understand the steps involved. By carefully following this guide, you can successfully repair your siding, restoring its beauty and protecting your home from the elements. Remember to take your time, double-check your measurements, and enjoy the satisfaction of a job well done! Your home will thank you for it.
Quick FAQs
What type of caulk should I use?
Use a high-quality exterior-grade caulk designed for use with fiber cement siding. Look for one that’s paintable and flexible to accommodate movement.
Can I paint the replacement piece before installation?
Yes, you can pre-paint the replacement piece for a more seamless finish. Make sure the paint is fully dry before installation.
How long does the paint need to dry before installation?
Allow the paint to dry completely according to the manufacturer’s instructions. This usually takes at least 24 hours, but longer is better to prevent issues.
What if I damage the surrounding siding during removal?
Carefully assess the damage. Minor nicks can be filled and painted. If the damage is significant, you may need to replace more than one piece of siding.
How do I dispose of the old siding?
Check with your local waste management facility for proper disposal guidelines. Some areas have specific requirements for disposing of fiber cement materials.
Comments are closed.