Siding Replacement Estimate A Cost Guide
Siding replacement estimate: Thinking about a siding upgrade? It’s a big decision, impacting both your home’s curb appeal and its long-term value. This guide walks you through understanding the costs involved, from initial estimates to the final project. We’ll break down factors affecting the price, explore different siding materials, and help you navigate the entire process with confidence.
From understanding the various types of siding and their price points to navigating contractor estimates and potential hidden costs, we’ll cover everything you need to know to make an informed decision. We’ll also show you how to gather necessary information, create a realistic budget, and effectively communicate with contractors to ensure a smooth and successful siding replacement project.
Understanding Siding Replacement Costs
Getting your siding replaced can be a significant investment, so understanding the cost factors is crucial. This section will break down the elements that contribute to the final estimate, helping you make informed decisions about your project. We’ll explore the various siding types, their price ranges, and the proportion of labor versus material costs.
Factors Influencing Siding Replacement Estimates
Several key factors influence the overall cost of a siding replacement project. The size of your house is a primary determinant; larger homes naturally require more materials and labor. The complexity of the job also plays a significant role. Houses with intricate architectural details, multiple stories, or difficult-to-access areas will generally cost more to side than simpler, single-story homes. The condition of your existing siding and underlying sheathing affects the scope of work; extensive repairs or replacements may increase the expense. Finally, your location and the prevailing labor rates in your area significantly impact the overall cost. Highly skilled labor in high-demand areas tends to be more expensive. Material costs fluctuate with market conditions and availability.
Siding Types and Cost Ranges
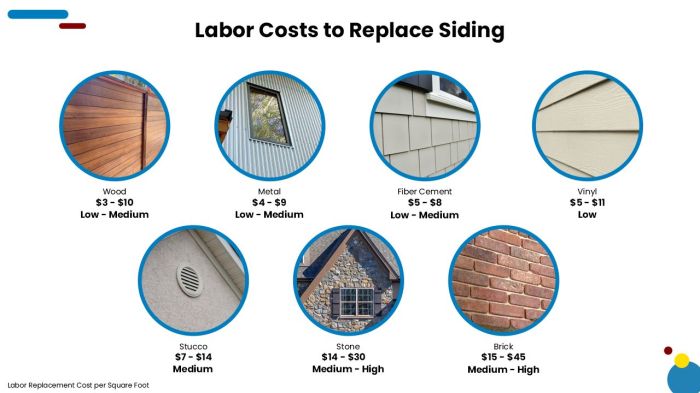
Different siding materials offer various aesthetics, durability, and price points. Vinyl siding is a popular budget-friendly option, generally costing between $3 and $12 per square foot installed. Wood siding, while offering a classic look, is more expensive, typically ranging from $10 to $30 per square foot installed, depending on the type of wood and finish. Fiber cement siding is a durable, low-maintenance option, falling within a price range of $8 to $20 per square foot installed. Metal siding, such as aluminum or steel, provides excellent durability and longevity but can be among the most expensive options, often costing $10 to $30 per square foot installed or more, depending on the type and style. The final cost will always depend on factors like material quality, color, and style.
Labor Costs Versus Material Costs
A typical siding replacement project sees a roughly even split between labor and material costs. However, this ratio can vary depending on several factors. Complex projects with extensive repairs or difficult access may skew the cost more towards labor. Conversely, projects involving large quantities of high-cost materials, such as certain types of wood or specialized metal siding, might shift the balance towards material costs. It’s essential to get a detailed breakdown from your contractor, clearly separating labor and material expenses to better understand the total cost.
Cost Comparison of Various Siding Materials
| Siding Type | Material Cost (per sq ft) | Labor Cost (per sq ft) | Total Estimated Cost (per sq ft) |
|---|---|---|---|
| Vinyl | $2 – $6 | $1 – $6 | $3 – $12 |
| Wood | $4 – $15 | $6 – $15 | $10 – $30 |
| Fiber Cement | $4 – $10 | $4 – $10 | $8 – $20 |
| Metal | $5 – $15 | $5 – $15 | $10 – $30 |
Gathering Information for an Estimate
Source: estimatorflorida.com
Getting an accurate siding replacement estimate requires gathering comprehensive information about your home and your preferences. This ensures you receive a fair price and the best possible outcome for your project. The more details you provide upfront, the smoother the process will be.
Accurate measurements are crucial for any construction project, and siding replacement is no exception. We’ll cover the essential information needed, how to collect it, and how it’s used to create a detailed and precise estimate.
Homeowner Questionnaire
This questionnaire aims to collect key information about your home and your siding replacement project. The answers will directly influence the accuracy and comprehensiveness of your estimate. The more thorough your responses, the better we can serve you.
- House Dimensions: We need precise measurements of your home’s exterior walls, including height, width, and any significant architectural features like dormers or bay windows. For example, providing the length of each wall section and the height from ground level to the roofline will allow for accurate calculations of the siding needed.
- Existing Siding Type: Specify the type of siding currently installed (e.g., vinyl, wood, aluminum, fiber cement). Knowing the material is vital, as different siding types require different installation methods and have varying costs. Include details about the siding’s condition, such as signs of damage or deterioration, which might influence labor costs.
- Desired Siding Type and Color: Indicate your preferred siding material and color. Various materials (e.g., vinyl, fiber cement, wood) have different price points and aesthetic qualities. Choosing a specific color is important as it might affect the cost depending on availability and any special order requirements.
- Additional Features: Note any additional features that need to be considered, such as the number of windows, doors, vents, and trim. The presence of complex architectural details or difficult-to-access areas will influence the overall project time and cost. For example, a home with many dormers or intricate trim work will require more labor.
- Budgetary Considerations: While a precise budget isn’t required at this stage, providing a general price range helps us tailor the options to your financial constraints. This allows us to explore different siding materials and options that fit within your budget.
Site Visit for Accurate Measurements
A site visit is essential for obtaining precise measurements and assessing the condition of your existing siding. During the visit, we’ll verify the information provided in the questionnaire and take detailed measurements of your home’s exterior. This allows us to identify any unforeseen challenges or complexities that may affect the cost. For instance, a site visit might reveal rotted wood under the siding, requiring additional repair work.
Data Organization for Analysis
Once the information is collected, we organize it into a structured format. This usually involves a spreadsheet or database system that allows us to quickly access and analyze all the relevant data. We typically categorize information by house section (e.g., front, back, sides), material type, and any specific features. This structured approach helps ensure that all aspects of the project are considered during the estimate preparation. For example, a typical spreadsheet might include columns for wall length, wall height, siding type, quantity needed, and cost per unit.
The Estimation Process
Getting an accurate estimate for your siding replacement is crucial for budgeting and planning. This involves a methodical process that considers several factors, from material costs to labor hours. The contractor’s approach to estimation will significantly impact the final price you pay.
The process typically begins with a thorough on-site assessment. The contractor will measure the area needing siding, identify the type of siding you’ve chosen, and note any complexities like unusual angles, multiple stories, or difficult-to-reach areas. They’ll also consider the condition of existing sheathing and whether repairs or replacements are necessary before new siding can be installed. Based on this assessment, they’ll develop a detailed breakdown of costs, including materials, labor, and potentially permits or other associated fees.
Pricing Models Used in Siding Replacement Estimates
Contractors employ different pricing models, each with its own advantages and disadvantages. Understanding these models helps you compare estimates effectively. Common models include square-foot pricing, per-unit pricing (e.g., per square of shingles), and bundled packages.
Square-foot pricing is common and relatively straightforward. The contractor calculates the total square footage of the siding and applies a price per square foot. This price incorporates material and labor costs. Per-unit pricing is often used for specialized materials like individual siding panels or trim pieces. Bundled packages offer a fixed price for a complete siding replacement, encompassing materials, labor, and potentially waste removal. A contractor might offer a basic package, a premium package with upgraded materials, or a custom package tailored to your specific needs and choices.
Fixed-Price versus Time-and-Materials Contracts, Siding replacement estimate
Choosing between a fixed-price contract and a time-and-materials contract is a significant decision.
A fixed-price contract, also known as a lump-sum contract, specifies a total cost for the entire project upfront. This provides budget certainty, but it can sometimes lead to disputes if unforeseen issues arise. For example, if the contractor discovers extensive rot under the existing siding that wasn’t initially apparent, additional charges might be necessary, leading to potential conflict. A time-and-materials contract charges you for the actual labor hours and materials used. This offers flexibility if unexpected problems occur, but it can lead to higher-than-anticipated costs if the project takes longer than initially estimated. Carefully consider the pros and cons of each type of contract and discuss them thoroughly with your contractor.
Calculating Material Quantities and Labor Hours
Accurate calculation of material quantities and labor hours is essential for a realistic estimate.
Material quantities are determined by measuring the surface area requiring siding, accounting for waste and overlaps. For example, if your house has 1,000 square feet of siding, you’ll need slightly more material to account for cuts and waste. Labor hours are estimated based on the complexity of the job, the size of the area, and the experience of the workers. A simple, small project might take a few days, while a larger, more complex project could take several weeks. Experienced contractors usually have established labor rates per hour and can accurately estimate the number of hours required for various tasks, including demolition, installation, and cleanup. It’s important to understand that labor costs are a significant part of the total cost of a siding replacement.
Accurate calculations require meticulous measurements and a thorough understanding of the project’s complexities.
Factors Affecting the Estimate
Source: sidingcalculator.com
Getting an accurate siding replacement estimate involves more than just square footage. Several factors can significantly influence the final cost, sometimes unexpectedly. Understanding these factors will help you prepare for the project and avoid unpleasant surprises. This section will highlight some key areas to consider.
Hidden Costs Associated with Siding Replacement
Unexpected expenses can easily arise during a siding replacement project. These often stem from unforeseen conditions discovered during demolition or installation. For instance, rotted sheathing beneath the old siding might require extensive repair or replacement, adding considerable cost. Similarly, discovering damaged or inadequate underlying insulation could necessitate additional work and materials. Another hidden cost could be the need for extra labor due to unexpected complexities in the house’s structure, such as unusual angles or difficult-to-access areas. Finally, unforeseen issues with electrical wiring or plumbing embedded within the wall system can lead to significant delays and extra expenses. Always factor in a contingency budget to account for such possibilities. A 10-15% buffer is a good starting point.
Permits and Inspections Impact on Cost
Building permits and inspections are essential for legal compliance and ensuring the quality of the work. The cost of permits varies greatly depending on location and the scope of the project. Some municipalities charge based on the square footage of the siding being replaced, while others have a flat fee. Inspection fees are typically added on top of permit costs and may be required at multiple stages of the project (e.g., before, during, and after installation). These fees can easily add hundreds, or even thousands, of dollars to the overall cost, depending on your location and the project’s complexity. For example, a large residential project in a city with stringent building codes might incur permit and inspection fees exceeding $1000. Always factor these costs into your budget early in the planning process.
Waste Disposal and Cleanup
Proper waste disposal and cleanup are crucial aspects of any siding replacement project. Old siding, insulation, and other debris need to be removed and disposed of responsibly, often incurring extra costs. The amount of waste generated will depend on the size of the house and the type of siding being replaced. Some contractors include waste removal in their base price, while others charge separately. It’s essential to clarify this aspect with your contractor upfront to avoid unexpected charges. If the contractor doesn’t include waste disposal, you should expect to pay extra, potentially ranging from a few hundred dollars for a small house to over a thousand for a larger one, depending on the volume and type of waste. In some areas, you might need to arrange for separate dumpster rentals, further increasing costs.
Weather Conditions Affecting Project Timeline and Costs
Weather conditions significantly impact the timeline and cost of a siding replacement project. Extreme heat, heavy rain, snow, or strong winds can cause delays and potentially damage materials. For example, rain can delay the installation of new siding, as it needs to be applied to a dry surface. Severe weather may necessitate additional protective measures or repairs, increasing the overall project cost. Contractors often build weather-related delays into their estimates, but prolonged inclement weather can still result in additional charges. A project delayed by a week due to unexpected rain could lead to additional labor costs for the contractor, and thus increase your final bill. Open communication with your contractor about weather contingencies is crucial.
Presenting the Estimate

Source: fixr.com
Once you’ve gathered all the necessary information and completed the estimation process, it’s time to present your findings to the homeowner in a clear, concise, and professional manner. A well-presented estimate significantly impacts your chances of securing the job.
Presenting the estimate involves more than just handing over a piece of paper; it’s about building trust and confidence in your services. This section details how to create a professional estimate and effectively communicate it to the client.
Estimate Template Design
A well-designed estimate template should be easy to read and understand, clearly outlining all costs involved. Consider using a professional-looking template, either pre-designed or created using word-processing software. Here’s an example of how an HTML table could be used:
| Item | Description | Quantity | Unit Price | Total Price |
|---|---|---|---|---|
| Siding Removal | Removal of existing vinyl siding | 1000 sq ft | $2.00/sq ft | $2000.00 |
| New Siding Installation | Installation of new James Hardie fiber cement siding | 1000 sq ft | $8.00/sq ft | $8000.00 |
| Materials (Nails, Flashing, etc.) | All necessary materials for installation | $500.00 | ||
| Labor | Labor costs for removal and installation | $2000.00 | ||
| Permits | Building permits and associated fees | $300.00 | ||
| Total | $12800.00 |
This table clearly breaks down each cost component, allowing the homeowner to understand where their money is going. Remember to include your company’s logo and contact information at the top.
Communicating the Estimate
Effective communication is crucial. Schedule a time to meet with the homeowner to review the estimate in person. This allows for a discussion of any questions or concerns they may have. Explain each item in detail, and be prepared to answer any questions thoroughly and patiently. Consider providing a digital copy of the estimate as well.
Transparency and Clear Communication of Costs
Transparency is paramount. Clearly state all costs upfront, avoiding hidden fees or surprises. This builds trust and avoids potential conflicts later on. If there are any potential additional costs (e.g., unforeseen repairs), clearly state this as a possibility, providing a range of potential costs if possible. For example, you might state: “While we anticipate a straightforward installation, there’s a possibility of needing to repair underlying sheathing, which could add between $500 and $1500 to the total cost, depending on the extent of the damage.”
Addressing Potential Scenarios
Budget constraints are a common concern. If a homeowner has a limited budget, explore options to reduce costs. This might involve using less expensive materials, reducing the scope of the project, or offering a phased approach. For instance, if the homeowner can’t afford the entire project at once, you could suggest doing one side of the house now and the other later.
Unexpected issues during the project are also possible. If you encounter unexpected problems (e.g., extensive rot requiring more extensive repairs), immediately contact the homeowner to explain the situation, provide options, and get their approval for any additional work before proceeding. Always maintain open communication to avoid misunderstandings and maintain a positive working relationship. Document all changes and approvals in writing.
Visual Aids for Estimates

Source: bbsiding.com
Visual aids are crucial for helping clients understand the scope and value of your siding replacement project. A picture is worth a thousand words, and well-chosen visuals can significantly improve client comprehension and increase the likelihood of securing the job. Effective visuals should clearly communicate the transformation, the construction details, and the long-term implications of different siding choices.
Before and After House Siding Illustration
This illustration should showcase a clear “before” and “after” view of the same house. The “before” image should depict the existing siding, highlighting its age, damage (e.g., cracks, fading, water damage), and overall aesthetic condition. Let’s imagine the “before” image shows a house with weathered, gray vinyl siding, exhibiting noticeable discoloration and some areas of warping. The “after” image, in contrast, would show the same house with newly installed cedar shake siding. The cedar shake siding has a rich, reddish-brown color, a textured surface, and a clean, uniform appearance. We could also include an example where the “before” shows a house with aging aluminum siding, showing signs of rust and dents, and the “after” image displays the same house with sleek, modern fiber cement siding in a sophisticated gray tone. The differences in texture, color, and overall condition should be dramatically apparent. The different siding types – vinyl, cedar shake, and fiber cement – are clearly identified and visually differentiated.
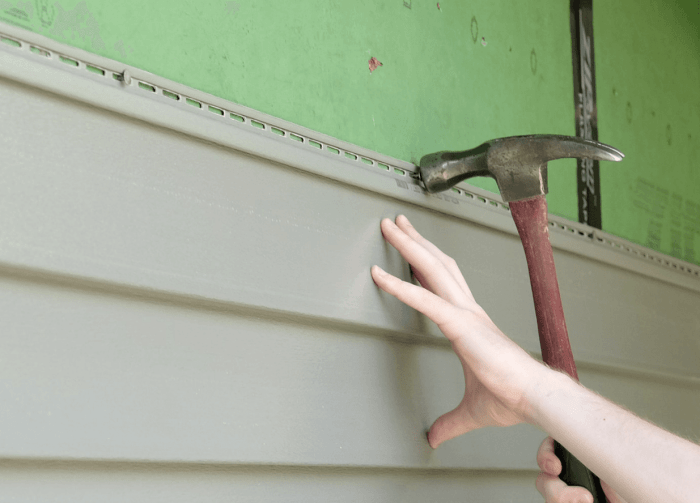
Cutaway Illustration of Wall Construction and Siding Installation
A cutaway illustration provides a cross-sectional view of the house wall, revealing the layers involved in siding installation. This illustration should show, from the exterior to the interior: the new siding (let’s say, vinyl in this example), the house wrap (a waterproof membrane), the sheathing (plywood or OSB), the insulation (fiberglass batts), and finally, the interior drywall. Each layer should be clearly labeled, and the illustration should demonstrate how the siding is properly fastened to the sheathing, with appropriate spacing and flashing around windows and doors. The illustration could highlight the importance of proper ventilation and moisture management to prevent future problems. For example, it could show the gap between the siding and the house wrap to allow for air circulation. A contrasting cutaway illustration could show improper installation – for instance, lack of house wrap leading to potential water damage – to emphasize the importance of proper techniques.
Lifespan and Maintenance Comparison of Siding Types
A visual comparison chart would effectively illustrate the differences in lifespan and maintenance requirements for various siding materials. A simple table could be used, with columns for “Siding Type” (e.g., Vinyl, Wood, Fiber Cement, Aluminum), “Estimated Lifespan (Years)” (e.g., 20-30, 25-50, 50-80, 20-40), and “Maintenance Requirements” (e.g., Low, Moderate, High). Within the “Maintenance Requirements” column, brief descriptions could be added, such as “occasional cleaning,” “periodic painting or staining,” or “potential for repair or replacement of damaged sections.” The chart could use visual cues like color-coding or bar graphs to represent the lifespan and maintenance levels, making the comparison immediately clear. For example, longer lifespans could be represented by longer bars and vibrant colors, while higher maintenance requirements could be shown with darker or less saturated colors. This allows for easy at-a-glance comparison and helps the client understand the long-term cost implications of each option.
Concluding Remarks: Siding Replacement Estimate
Getting a siding replacement estimate doesn’t have to be daunting. By understanding the factors that influence cost, gathering necessary information, and communicating effectively with contractors, you can ensure a smooth and successful project. Remember to factor in potential hidden costs and clearly communicate your budget expectations. With careful planning and this guide as your resource, you’ll be well-equipped to make the best decisions for your home.
Answers to Common Questions
What’s the average lifespan of different siding materials?
Vinyl siding typically lasts 20-30 years, wood siding 20-50 years (depending on maintenance), and fiber cement siding 50+ years.
Do I need permits for siding replacement?
Generally, yes. Check with your local building department; permit requirements vary by location.
Can I get financing for siding replacement?
Many contractors offer financing options, or you can explore home improvement loans through banks or credit unions.
How much should I expect to pay for a site visit?
Some contractors offer free site visits, while others may charge a small fee, often credited towards the final project cost if you hire them.
What should I do if I find a discrepancy in estimates from different contractors?
Ask clarifying questions about the materials, labor, and scope of work included in each estimate to understand the differences.
Comments are closed.