Wood Siding Contractors Your Guide
Wood siding contractors are essential for anyone looking to enhance their home’s exterior with the natural beauty and durability of wood. Choosing the right contractor, however, requires careful consideration. This guide walks you through finding reputable professionals, understanding the different types of wood siding, navigating the installation process, budgeting effectively, and ensuring long-term maintenance. We’ll cover everything from finding qualified contractors to understanding the costs and legal aspects involved.
From initial consultations to final inspections, we’ll break down the entire process step-by-step, helping you make informed decisions every step of the way. We’ll also explore the various types of wood siding available, their unique properties, and the specialized skills needed for proper installation. By the end, you’ll be equipped to confidently embark on your wood siding project.
Finding Wood Siding Contractors
Finding the right contractor for your wood siding project is crucial for a successful outcome. A poorly chosen contractor can lead to costly mistakes, inferior workmanship, and significant delays. This section will guide you through the process of locating and vetting potential contractors, helping you make an informed decision.
Resources for Locating Wood Siding Contractors
Several resources can help you find reputable wood siding contractors in your area. Utilizing a combination of these methods increases your chances of finding a qualified professional.
Online directories, such as HomeAdvisor, Angie’s List (now Angi), and Yelp, allow you to search for contractors based on location and read reviews from previous clients. These platforms often provide ratings and allow users to filter results based on specific criteria, like specialization in wood siding. Professional associations, such as the National Association of the Remodeling Industry (NARI) and local chapters of similar organizations, maintain directories of their members. These members often adhere to a code of ethics and professional standards, offering a higher level of assurance. Finally, local referral services, including your local chamber of commerce or home improvement stores, can provide recommendations based on their experience with contractors in your community. Networking with friends, family, and neighbors who have recently completed similar projects can also yield valuable leads.
Vetting Potential Contractors
Thoroughly vetting potential contractors is essential to avoid problems down the line. This involves checking their licensing, insurance, and experience.
Verify that the contractor holds the necessary licenses and permits required to operate legally in your area. Contact your local licensing board to confirm the validity of their license and check for any complaints or disciplinary actions. Ensure they carry adequate liability and workers’ compensation insurance to protect you from potential financial losses in case of accidents or damages. Request proof of insurance and verify its coverage with the insurer. Investigate their experience by asking for references, viewing their portfolio of completed projects (ideally similar to yours), and checking online reviews. Inquire about their process, from initial consultation to project completion, and seek clarity on their communication style and responsiveness. The more information you gather, the better equipped you’ll be to make a sound decision.
Comparison of Large vs. Small Contracting Firms
The decision of whether to hire a large or small contracting firm often comes down to individual project needs and preferences. Each option presents unique advantages and disadvantages.
| Contractor Size | Cost | Experience | Responsiveness |
|---|---|---|---|
| Large Firm | Potentially higher overhead costs, but may offer discounts on larger projects. | Usually extensive experience and established processes, but may lack personalized attention. | May have longer response times due to higher volume of clients, but often have dedicated customer service teams. |
| Small Firm | Potentially lower overhead costs, leading to potentially lower overall project costs. | May have less extensive experience but often offer more personalized attention and direct communication with the owner. | Typically more responsive due to smaller client base, but may have limited resources for larger projects. |
Types of Wood Siding and Contractor Expertise
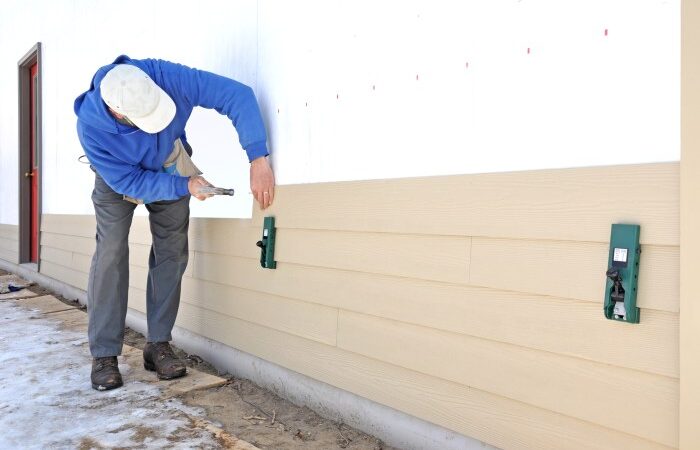
Source: modernize.com
Choosing the right wood siding for your home is a big decision, impacting both aesthetics and longevity. Understanding the different types of wood and the specialized skills needed for their installation is crucial for a successful project. This section will explore various wood siding options and highlight the expertise you should look for in a contractor.
Choosing the right wood siding material depends on your budget, desired aesthetic, and the climate where your house is located. Different woods possess unique properties that affect their durability, maintenance requirements, and overall cost. Matching the wood type to your needs and finding a contractor with the appropriate experience is essential for a long-lasting and beautiful result.
Wood Siding Material Properties
Cedar, redwood, and pine are popular choices for wood siding, each offering distinct advantages and disadvantages. Cedar, known for its natural beauty and resistance to rot and insects, is a premium option often favored for its rich color and aromatic scent. Redwood, similarly resistant to decay, boasts exceptional strength and durability, making it ideal for harsh climates. Pine, a more economical choice, offers a classic look but may require more frequent maintenance due to its susceptibility to rot and insect damage if not properly treated. The differences in density and grain structure also influence the difficulty of installation.
Contractor Expertise and Experience
The installation of wood siding requires specific skills and experience. Working with cedar, for example, demands precision due to its relatively soft nature. A skilled contractor will understand how to handle this wood to prevent damage during installation and ensure a seamless finish. Redwood’s density requires a different approach, necessitating tools and techniques that can handle its harder texture. Pine, while easier to work with than cedar or redwood, still needs careful handling to avoid cracking or splitting. Experience with various fastening methods, appropriate sealant application, and understanding of moisture control are also crucial for all types of wood siding. A contractor’s portfolio should showcase successful projects featuring the specific wood type you’ve chosen.
Questions to Ask Potential Contractors
Before hiring a contractor, it’s vital to assess their experience and capabilities. Asking the right questions can help you make an informed decision.
- How many years of experience do you have installing [specific wood type, e.g., cedar] siding?
- Can you provide references for projects similar to mine, using the same wood type?
- What specific installation techniques do you employ for [specific wood type] to ensure longevity and prevent damage?
- What type of fasteners and sealants do you use, and why are they appropriate for [specific wood type]?
- What is your process for addressing moisture control during and after installation of [specific wood type] siding?
- Do you have experience with different siding profiles and patterns, and are you comfortable with the style I’ve chosen?
- What is your warranty on workmanship and materials for [specific wood type] siding installations?
The Wood Siding Installation Process
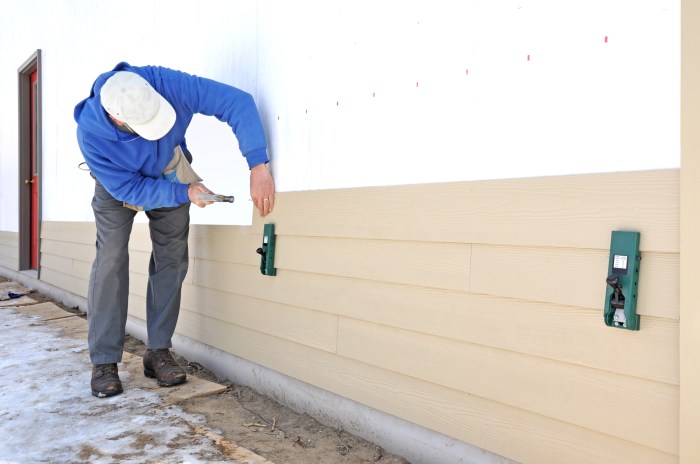
Source: sidingauthority.com
Getting beautiful, durable wood siding on your home is a significant project, and understanding the installation process is key to a successful outcome. A well-executed installation ensures years of enjoyment and protection for your home. This involves careful planning, precise execution, and adherence to building codes. Let’s break down the key stages.
Proper preparation and a thorough site assessment are paramount before any installation begins. This preliminary work directly impacts the efficiency and quality of the final product. Failing to properly prepare can lead to delays, increased costs, and even structural issues down the line.
Site Assessment and Preparation
A comprehensive site assessment involves evaluating the existing structure, checking for any damage or rot, measuring the area needing siding, and noting any obstacles like existing fixtures or landscaping. This assessment helps determine material needs and the overall project timeline. Preparation includes cleaning the area, removing old siding (if applicable), and ensuring the underlying structure is sound and properly prepared for the new siding. This might include repairs to sheathing or the installation of weather-resistant barrier. For example, rotten wood needs to be replaced before new siding can be installed. Ignoring this could lead to future problems and costly repairs.
Obtaining Permits and Inspections
Navigating the permitting process is crucial for any home improvement project, including wood siding installation. The specific requirements vary by location, but generally involve submitting plans and specifications to your local building department. These plans should detail the type of wood siding, the installation method, and any other relevant details. Inspections are typically scheduled at various stages of the project – for example, after the sheathing is installed and before the siding is applied, and finally, a final inspection upon completion. Failure to obtain necessary permits can result in hefty fines and potential legal issues. It’s best to contact your local building department early in the planning process to understand the exact requirements and timelines.
Wood Siding Installation Steps
The installation process itself is a detailed procedure that requires skilled labor. Generally, it involves these steps:
- Framing and Sheathing: Ensuring a solid and level surface for the siding is critical. This might involve adding additional framing or reinforcing existing sheathing.
- Water-Resistant Barrier Installation: A properly installed barrier protects the house from moisture damage. This is a crucial step in preventing rot and mold.
- Siding Installation: This involves carefully attaching the wood siding boards to the sheathing, ensuring proper overlapping and alignment. The specific technique varies depending on the type of siding used (e.g., lap siding, shiplap, board and batten).
- Trim and Finishing: Installing trim around windows, doors, and corners completes the aesthetic look and provides additional weather protection. Caulking and sealing are essential for preventing water infiltration.
Final Cleanup and Project Completion
Once the siding is installed and inspected, the final step involves a thorough cleanup of the worksite. This includes removing debris, disposing of waste materials properly, and ensuring the area is left clean and tidy. A final walk-through with the homeowner to address any concerns or questions is also standard practice.
Cost and Budgeting for Wood Siding Projects
Planning the budget for your wood siding project requires careful consideration of several factors. Understanding these costs upfront will help you avoid unexpected expenses and ensure a smooth project execution. Accurate budgeting involves more than just the material cost; it encompasses labor, permits, and potential unforeseen issues.
Accurate cost estimations depend heavily on the project’s scope. A small shed will naturally cost significantly less than a large, two-story house. The type of wood chosen, its quality, and the complexity of the design all play a crucial role in determining the final price. Additionally, regional variations in labor rates and material availability can impact the overall cost.
Cost Breakdown Examples
Let’s consider three hypothetical projects to illustrate potential cost breakdowns. These examples are for illustrative purposes and actual costs may vary significantly based on location and specifics.
Project 1: Small Shed (100 sq ft)
Material Costs (Cedar): $1,500 (including fasteners and trim)
Labor Costs: $1,000 – $1,500 (depending on contractor and complexity)
Permits: $100 – $300 (varies by location)
Total Estimated Cost: $2,600 – $3,300
Project 2: Single-Story House (1,500 sq ft)
Material Costs (Pine): $15,000 – $20,000 (depending on grade and finish)
Labor Costs: $10,000 – $15,000 (more complex installation)
Permits: $500 – $1,000
Total Estimated Cost: $25,500 – $36,000
Project 3: Two-Story House (3,000 sq ft) with Complex Design
Material Costs (High-Grade Redwood): $30,000 – $45,000
Labor Costs: $20,000 – $30,000 (increased labor due to complexity and size)
Permits: $1,000 – $2,000
Total Estimated Cost: $51,000 – $77,000
Negotiating Prices and Obtaining Bids
Getting multiple bids from reputable contractors is crucial for securing the best price. Clearly define the scope of your project in writing, including all materials and labor requirements. This ensures all contractors are bidding on the same project. Don’t hesitate to negotiate; contractors often have some flexibility in their pricing. Ask for detailed breakdowns of their costs and compare apples to apples.
Cost-Saving Measures
Planning for cost savings is important, but it’s essential to avoid compromising quality. Here’s a table outlining potential cost-saving measures and their associated risks:
| Measure | Description | Cost Savings | Potential Risks |
|---|---|---|---|
| Choosing Less Expensive Wood | Opting for pine or fir instead of cedar or redwood. | Significant | Reduced durability, shorter lifespan, increased maintenance. |
| DIY Preparation Work | Preparing the surface (removing old siding, etc.) yourself. | Moderate | Potential for mistakes, delays, and injury. Requires skill and time. |
| Simplifying the Design | Avoiding intricate detailing or custom features. | Moderate to Significant | Less aesthetically pleasing outcome. |
| Staggering the Project | Breaking the project into phases (e.g., doing one side of the house at a time). | Minimal | Potential for longer project duration and increased disruption. |
Maintenance and Longevity of Wood Siding
Proper maintenance is key to extending the life and beauty of your wood siding. Regular care prevents damage, maintains its aesthetic appeal, and ultimately saves you money on costly repairs down the line. Neglecting maintenance, however, can lead to premature deterioration and significantly reduce the lifespan of your investment.
Common Wood Siding Maintenance Practices
Maintaining your wood siding involves a straightforward, yet consistent, approach. This includes routine cleaning, timely staining or sealing, and prompt attention to any signs of damage. Ignoring these steps can lead to rot, insect infestation, and other issues that will reduce the siding’s lifespan and increase repair costs.
- Cleaning: At least once a year, pressure wash your siding to remove dirt, mildew, and loose debris. Use a low-pressure setting to avoid damaging the wood. For stubborn stains, consider using a mild bleach solution (always test in an inconspicuous area first). Allow the siding to dry completely before applying any treatments.
- Staining and Sealing: Depending on the type of wood and the climate, you’ll need to re-stain or seal your siding every 2-5 years. This protects the wood from moisture, UV damage, and insect infestation. Choose a high-quality stain or sealant designed for exterior use and follow the manufacturer’s instructions carefully.
- Repair: Address any minor damage promptly. This might involve replacing damaged boards, patching holes, or caulking gaps. For larger repairs or extensive damage, it’s best to consult a professional wood siding contractor.
Factors Influencing Wood Siding Lifespan
Several factors contribute to the longevity of your wood siding. Understanding these factors allows for proactive maintenance and informed decisions during the initial selection and installation phases.
- Material Quality: The type of wood used significantly impacts its lifespan. Hardwoods like cedar and redwood are naturally more resistant to rot and insects than softer woods. The grade of the lumber also matters; higher-grade lumber is less likely to have defects that can lead to premature failure. For example, high-grade cedar siding, properly maintained, can last 50 years or more, while lower-grade pine might only last 20 years.
- Installation Techniques: Proper installation is crucial. Adequate ventilation behind the siding prevents moisture buildup, a major contributor to rot. Correct flashing and caulking around windows and doors prevent water penetration. Poor installation can dramatically shorten the lifespan, even with high-quality materials. A poorly installed cedar siding, for instance, might show signs of rot within 10 years due to trapped moisture.
- Environmental Conditions: Climate plays a significant role. Areas with high humidity and frequent rainfall will require more frequent maintenance than drier climates. Exposure to direct sunlight can also accelerate fading and deterioration. Coastal areas, with their salty air, pose a unique challenge, requiring more robust protective treatments.
Signs of Wood Siding Damage Requiring Professional Attention
Recognizing the signs of serious wood siding damage is critical for timely intervention. Ignoring these signs can lead to extensive and costly repairs.
Imagine a section of your siding. You notice significant discoloration, far beyond what regular cleaning can resolve; perhaps a large, dark, water-stained area. In another area, you see visible cracks or splits in the wood, extending beyond superficial surface damage. Furthermore, you might observe swelling or warping of individual boards, indicating water damage. Finally, you may notice evidence of insect infestation, such as holes, sawdust, or the presence of insects themselves. Any of these indicators suggest the need for professional assessment and repair. Delaying action could lead to more extensive damage and higher repair costs.
Legal and Warranty Considerations

Source: cdn-website.com
Choosing a wood siding contractor involves more than just finding someone who can build a beautiful exterior. Understanding the legal and warranty aspects is crucial to protecting your investment and avoiding potential disputes. This section will Artikel common legal issues and best practices to ensure a smooth and legally sound project.
Contractual agreements form the bedrock of any successful construction project. Failing to thoroughly review and understand the contract can lead to significant problems down the line. It’s vital to clarify all aspects of the project before signing any documents.
Contract Review and Understanding
Before signing any contract with a wood siding contractor, take the time to carefully read and understand every clause. Pay close attention to details such as the scope of work (exactly what materials and labor are included), payment schedules, timelines, and warranty provisions. If anything is unclear, don’t hesitate to ask the contractor for clarification. Consider having a lawyer review the contract, especially for larger projects. A well-defined contract minimizes the risk of misunderstandings and disputes later on. For example, a clearly defined scope of work will prevent arguments over additional costs for unforeseen issues. A detailed payment schedule helps to manage the project’s finances effectively and avoid late payments.
Project Documentation Best Practices
Maintaining meticulous records throughout the project is essential. This documentation serves as proof of agreements, payments, and the project’s progress. This includes keeping copies of the signed contract, change orders (if any modifications are made), receipts for payments, and detailed communication records (emails, texts, and meeting notes). Regularly documenting the project’s progress with photos and videos can also be beneficial in case of disputes. For instance, photographs taken before, during, and after the installation can provide irrefutable evidence of the work performed and the condition of the siding. Detailed records of communication, including dates and times, can help resolve disagreements about timelines and responsibilities.
Common Legal Issues in Wood Siding Projects, Wood siding contractors
Several legal issues can arise during wood siding projects. These often stem from poorly defined contracts, inadequate communication, or unforeseen circumstances. Contract disputes, concerning payment, timelines, or the quality of workmanship, are common. Warranty claims, related to defects in materials or workmanship, are another frequent issue. For example, a contractor might fail to meet the agreed-upon deadline, leading to a breach of contract. Alternatively, the siding might develop defects within the warranty period, requiring the contractor to address the problem. Proper documentation and a well-written contract significantly reduce the likelihood of these issues.
Warranty Claims and Procedures
Most reputable wood siding contractors offer warranties on their work and materials. These warranties typically cover defects in materials or workmanship for a specific period. Understanding the terms and conditions of the warranty is crucial. If problems arise within the warranty period, you’ll need to follow the specified procedure for filing a claim. This usually involves providing documentation, such as photographs and dates of the issues, to support your claim. The contractor will then assess the claim and determine whether the issue is covered by the warranty. It’s advisable to keep a copy of the warranty documentation and any communication with the contractor concerning warranty claims. Ignoring the warranty terms and procedures can severely limit your ability to claim repairs or replacements.
Ending Remarks: Wood Siding Contractors
Transforming your home’s exterior with wood siding is a significant undertaking, but with careful planning and the right contractor, it can be a rewarding experience. Remember to prioritize thorough research, clear communication, and a well-structured contract. By following the steps Artikeld in this guide, you can ensure a successful project that enhances your home’s curb appeal and value for years to come. Don’t hesitate to ask questions and always choose a contractor you trust.
Key Questions Answered
What’s the average lifespan of wood siding?
With proper maintenance, wood siding can last 30-50 years or even longer. However, this depends on the wood type, installation quality, and environmental factors.
How do I know if a contractor is licensed and insured?
Ask for proof of licensing and insurance certificates. You can also verify this information through your state’s licensing board or contractor registration database.
What should I look for in a contract?
A detailed contract should specify project scope, payment schedule, materials used, warranty information, and dispute resolution procedures. Review it carefully before signing.
Can I get financing for my wood siding project?
Yes, many contractors offer financing options or you can explore home improvement loans through banks or credit unions.
What are some common signs of wood siding damage?
Look for cracks, rot, insect infestation, peeling paint, or significant discoloration. Water stains are also a major warning sign.
Comments are closed.